JIRA is an excellent tracking tool from Atlassian. And now JIRA Agile (previously known as Greenhopper) is an excellent Agile Project Management tool built on top of the power of JIRA.
So how do you put JIRA Agile to work and make it sing a great Scrum song ?
In this article I’ll detail out:
- How to get JIRA Agile up and running fast.
- How to understand and reconcile the differences between the way JIRA Agile works and the way a true Scrum process works.
- How to configure JIRA Agile to take full advantage of the Scrum development management framework.
- How to use JIRA Agile to manage a Scrum process fast and easy.
- How to simplify the process related work that your engineers need to do, so they can focus on what they do best.
I’ve been using the Atlasssian tools for many years now and have a lot of experience doing many of the things you can do with JIRA and Confluence. From implementations and migrations from other tools like Bugzilla and others. To multi-day workshops with engineering teams at tech companies, some of which are very well recognized big tech names, to understand the teams processes and optimize the JIRA configuration to best support them and bring their processes up to the next level. To custom software development to extend JIRA’s functionality, build migration tools and connect and sync it with other platforms like Salesforce and ServiceNow.
I’ve also optimized the configurations of JIRA Agile and what it was previously called in older versions, Greenhopper, to manage software development projects using Scrum. And in this article I’ll share some of those techniques and best practices that I’ve learned based on real world, on the ground, experience.
What is JIRA Agile ?
JIRA is a tracking tool from Atlassian has been a great tool for years. For it’s first few major versions it was focused primarily on issue tracking. And since they added the Greenhopper add on to their product line, it’s become a great tool for Agile processes as well. With JIRA v6, Greenhopper was renamed JIRA Agile and has gotten even better.
Tools like JIRA Agile are known broadly as Agile Lifecycle Management (ALM) tools. And more specifically JIRA Agile is positioned as an Agile Project Management tool that specifically supports 2 Agile process frameworks, Scrum and Kanban.
Based on JIRA Agile Self Hosted v6.3.7
Since Atlasssian is constantly updating and improving JIRA, and their other products, it’s important to understand that the information in this article is based on JIRA Agile 6.3.7 in the self hosted version. And so your experience may differ if you are using a different version or the cloud service.
It’s equally important to note that I am using the the self hosted version of JIRA Agile 6.3.7, which on their JIRA Pricing web page they currently refer to as Server (You host). This is the version you download and install on your own server. As opposed to the Altassian OnDemand version they refer to on the pricing page as Cloud (We host).
I have used both versions just recently, and they do behave slightly differently, have slightly different feature sets and user experiences. For example, Atlassian seems to sometimes be testing out new features and UXes in the cloud version of the software, before releasing it in the self hosted version.
Get JIRA Agile up and running fast
So how do you get JIRA Agile up and running really fast ? Atlassian makes that pretty easy. JIRA and Confluence, and their various add-ons like JIRA Agile, are available as hosted cloud or software as a service (SaaS), that they call Altassian OnDemand. And as self hosted – software you can download and install on your own servers.
Licensing is simple and easy. You can get a 30 day evaluation license for free. And you can purchase a license for the self hosted version for as little as $20 for JIRA Agile, $10 for JIRA only, which allows 10 users. With the cloud hosted Atlassian OnDemand offering the licensing is done directly within the admin interface. With the self hosted software, the licensing can be done during the install.
It’s all pretty sweet and easy 🙂
TIPS: If you do your own install in a virtual machine (VM).
Make sure you’ve got plenty of processor and memory resources. Slow performance will cause JIRA components to not start at all. And on slow VMs, JIRA can take forever to start. Slow processors especially can cause this problem. As far as RAM, 2Gb is plenty for evaluation and testing purposes.
Also suspend your VM, don’t shutdown the OS. You’ll avoid the long OS and even longer JIRA start. Once started JIRA is quite fast.
Formatting Conventions
In the step by step instructions below I use the following formatting conventions.
Bold underlined text = Text links, menus and other items that display on the page that are clickable.
Italic text = Text that displays on the page, but is not clickable.
Understand and reconcile the differences between JIRA Agile & Scrum
You can just go right ahead and put the JIRA configuration changes I describe in this article directly to work. Just jump ahead to the section Configure JIRA Agile to take full advantage of Scrum.
I’ve designed them so that someone experienced in industry standard Scrum or even fresh out of a Scrum class that follows the official ScrumAlliance course requirements, can use it immediately without needing any JIRA experience.
But if you’d like to fully understand the changes to the JIRA configuration that I recommend in this article, we need to cover the differences between the way JIRA Agile works and the way a true Scrum process works.
Out of the box JIRA Agile has some great core ALM functionality. But, as with some other ALM tools, it needs some configuration to make it an optimal ALM tool. And some of it’s functionality out of the box is still limited by it’s heritage as an issuing tracking tool.
Issue tracking tools are spectacular at a ton of things that require status tracking, workflow for routing issues around to people, flexible security and rich content. And JIRA is by far one of the best issue tracking tools out there. Issue trackers are great for things like bug tracking, help desk, support management, operations and more. So JIRA is extremely popular in Silicon Valley and the technology business. But I’ve also helped companies that have nothing to do the the tech biz, put JIRA to excellent use. So it’s a very universally powerful tool and not just for tech.
One of the challenges with JIRA Agile, compared to other ALM tools, is that it is an add on to JIRA. As opposed to other ALM tools that have been built from the ground up as ALM tools. Since JIRA’s heritage is as an issue tracking tool, JIRA Agile approaches ALM from a distinctly issue tracking perspective and so has a noticeably issue tracking spin on how it manages Scrum. Not exactly a perfect fit. As a result, it does have what some would consider limitations, compared to other Agile tools. However, with the configuration best practices that I’ll detail here, those limitations that be eliminated or worked around.
We need to cover some essentials about the way JIRA Agile works, that will impact how you configure and implement it. The complete JIRA Administration Guide is available on-line. But here are some important things you need to know.
Complexity you Don’t Need
Out of the box and using defaults for a Scrum project, JIRA Agile gives you a lot of stuff in your JIRA projects that you just don’t need for true Scrum. It results in quite a cluttered User eXperience (UX) filled with fields in it that are un-intuitive at best. Preset fields that contradict each other as to their purpose. And at worse are extremely bad Scrum project design and some fields and functionality that is just plain broken.
For experienced JIRA users, they may be familiar with all of this JIRA-ness, and they will just ignore what they don’t need and should not use. But for users new to JIRA and/or folks new to Scrum, it can cause one big ginormous mess.
For example, JIRA comes with a lot of default Issue Types. Eleven of them when you create an out of the box Scrum project using the steps listed in the section Create Your Project via the Agile menu below. Here’s a screen shot of the 11 issue types that are configured for a Scrum project out of the box.
 |
| Default Issue Types on a JIRA Agile Scrum project |
This is fine if you want a bunch of examples to start with the first time and you will later cut down the issue types and customize them. But when you create a Scrum project with the Agile menu, JIRA Agile does not get rid of the stuff that is not true Scrum and all the extra junk that you don’t need and makes no sense. You’re left with Issue Types like Bug, Defect, New Feature, Improvement and others and they all have the same fields. And other issue types that are redundant and confusing like Task, Sub-task and Technical Task. And New Feature and Feature. Bug and Defect. “What’s the diff ?” – one might ask. None. They all function about the same. So why have all these issue types if they all do about the same thing ? There is no reason to have all of this, if you’re using true Scrum.
So the JIRA configuration changes that I recommend in this article accomplish 2 things to simplify JIRA Agile to be able to use true Scrum properly:
- Eliminates unneeded Issue Types.
- Eliminates unneeded fields, and include only the fields needed for each issue type.
So, a Story has only Story related fields. And a Sub-task has only task related fields. Might sound like common sense, but just take a peek at the default issue types and fields. For example, Sprint, Estimates, Epic Link, Fix Version, etc. appear on all issue types. Imagine, should a Theme ever have an estimate or be assigned to a Sprint ? Of course not, that’s ridiculous. Yet the JIRA Agile defaults for a Scrum project are setup that way. Check out this screen shot.
 |
| Default Fields on all Issue Types |
This is in great need of being cleaned up and simplified.
Broken and Nonsensical Out of the Box Stuff needing Fixing
This section was added on Jan. 18, 2015 to expand on the specific reasons why you need to “fix” JIRA Agile to use it with Scrum.
In a nutshell, the Epic issue type demonstrates all the reasons why you should NOT use JIRA Agile out of the box. Think about how an Epic, or even a Story, is supposed to be used in true Scrum. Now take a look at the screen shot below of what the Epic issue type looks like with an unmodified, out of the box installation of JIRA Agile.
 |
| Epic issue type in Edit Mode |
It’s a mess.
Here’s some of the stuff that makes no sense and is even broken, right out of the box – going in the order that the problems appear on the issue.
- Priority – In Scrum you do not prioritize with Minor, Major, Critical, etc. You rank Stories in unique order. This make even less sense, when you consider that a JIRA Agile Board includes this unique ranking functionality. Making Priority completely unnecessary and confusing.
 |
| Priority field |
- Priority field values – When designing a process using simple priorities, you typically would use simple values like High, Medium, Low or the type of default values in JIRA Agile – Critical, Major, Minor, Trivial. But Blocker is not an appropriate priority value. Blocked is typically defined as a workflow state or a relationship to another issue, not a priority. That’s because an issue’s priority typically does not change through the life of an issue. But an issue might get blocked, usually temporarily, while moving through a workflow. For example, a workflow might consist of the workflow states – To Do, In Progress and Done. And while In Progress it might be determined that the issue is blocked. In addition, something is a Blocker in relation to something else. And can and should be done using the Linked Issues field in JIRA, which supports defining blocking relationships between issues. Not with a Priority field.
- Environment is a totally irrelevant field in Scrum. As the help line displayed under the field says, it’s for things like “operating system, software platform and/or hardware specifications”. Things that would be used in a support center or help desk, to track service tickets/issues from customers or end users. But not in a Scrum software development project.
- Original Estimate & Remaining Estimate – These represent the time tracking functionality in JIRA. While useful in Sub-tasks in Scrum, they do not belong here in an Epic, nor in a Story.
- Epic Link – This one is totally classic. It’s broken !!! Right out of the box, it’s broken. See the red text displayed right there. So if “An epic cannot have another epic linked to it.” then why the heck is it on an Epic issue type, straight out of the box ? Nuts….
 |
| Epic issue type Epic Link field error |
- Sprint – Per Scrum guidelines, you should not and would not put an Epic in a Sprint. Because by definition in Scrum, Epics are Stories that are too big to work on in a Sprint and must be broken down. Even the odd, non-standard Scrum way that JIRA uses Epics, it still would never make sense to put an Epic in a Sprint, even if JIRA would let you. Which…. you guessed it…. it doesn’t !!!
The mess extends everywhere. Check this out. The screen shot below shows the Epic Link field in a Sub-task issue type, displaying an error message in red.
 |
| Sub-task issue type Epic Link field error |
What The …. !!!! There’s an out of the box Sub-task configuration, and it’s broken. A Sub-task is NOT linked to an Epic. So it makes no sense to include the Epic Link filed on a Sub-task issue type.
But there’s more….
This stuff is throughout the 11 issue types that come with JIRA Agile straight out of the box. It’s a big mess.
So there ya’ go. Don’t ever use JIRA Agile out of the box, without FIXING it to match the Scrum process correctly.
JIRA Agile Epics Work Differently than Scrum Epics
In true Scrum an Epic is simply a Story that is too large to be put in a Sprint Plan and so you must break down Epics. But in JIRA Agile, in addition to this use it also uses an Epic as a mechanism to categorize Stories and report on their progress. It does this by relating a Story, as a child object to an Epic. The Epic then becomes the parent object to many child Stories. This is similar to how a Feature is supposed to be used in true Scrum.
In JIRA Agile, Epics also provide some built in hard coded functionality on a Scrum board (called an Agile Board in JIRA Agile) and extra reporting. These extra uses of an Epic are built in to JIRA Agile, and there is no way that I can find in JIRA administration to disable it, adjust it or rename it. For example, renaming it to a Feature would allow it to work like true Scrum is supposed to work. So it’s best to use it as designed in JIRA Agile, and redefine an Epic to use it the way you would use a Feature in true Scrum.
 |
| Extra Epic features on an Agile Board |
If you’d like, in JIRA Agile you can use an Epic in the true Scrum sense – that being that it is a large Story that you will break down as you plan out your work. But also you can use it as a Feature would be used in true Scrum – that is to categorize Stories. You’ll be able to get some useful reports and burndown charts on the Epics. And JIRA Agile has some handy Epic level functionality on Agile Boards for dragging and dropping Stories in to Epics, roll up sums of points and counts, and color coded tagging, etc.
JIRA Agile has no functionality for Product Roadmap planning, and defining Themes and Features, in a true Scrum sense. That’s OK, because this kind of Scrum planning is intended to take a simple form, so you can use a white board or spreadsheet. But use a tool like JIRA Agile to manage a Product Backlog, plan and break down Stories, Sprint Planning and all the other Scrum activities and artifacts.
This is easy to live with, you just need to know about it and keep it in mind. And use the recommendations I’ve included here 😀
Only 1 Scrum Team per JIRA Agile Scrum Board
JIRA Agile is designed to support only 1 active Sprint per JIRA Agile Scrum Board. So that means each Scrum team must use a separate JIRA Agile Scrum Board
. This is covered in the JIRA Administration Guide in the Working with Sprints section. The Starting a Sprint topic specifically discusses that currently you cannot have more than 1 Sprint active at a time.
Some might consider this a limitation, others a feature by design. Regardless of your perspective, it just IS. So we need to deal with it.
It is helpful from a Scrum best practice viewpoint. It helps serve the goals of focus and keeping it simple. The Scrum team isn’t distracted by work that other teams are doing. Until they need to look at it. The JIRA Agile Scrum Board workspace stays focused on only what the Scrum team is doing.
JIRA does have lots of features that make it simple to share data between boards and projects. Easy linking, quick real time look ups and more. Boards can also be configured to include JIRA Stories and other items (called Issues in JIRA) from more than 1 JIRA project. And you can quickly move and copy issues between JIRA projects.
A couple of other things to note, but since they are more advanced topics I will not be covering them in this article.
- Agile Boards are very flexible and can be configured to include issues from more than 1 JIRA project and more than 1 Scrum team too. But to keep it simple for now, only follow the steps below using the Agile Getting Started page below.
- I’ve noticed that Atlasssian is working on an enhancement that will allow more than Sprint per Agile Board, so that might make it’s way in to future versions.
Configure JIRA Agile to take full advantage of Scrum
To configure JIRA Agile to take full advantage of the Scrum development management framework, we will need to customize JIRA Agile. Out of the box JIRA Agile is more complicated than it needs to be to run a Scrum process. The Scrum project defaults out of the box include many fields and elements that are not needed, when you are using a true Scrum process based on industry standards and the process as it is taught and promoted by the ScrumAlliance.
We are going to need to add some new administration elements to JIRA to accomplish this goal. If you are not familiar with JIRA administration, don’t worry these are standard things that everyone should do when they implement JIRA or any tool for that matter. It’s best to engage a tools expert, so you can benefit the most from the use of the tool.
Pre-requisites
You will need JIRA administration permissions. See the JIRA Administration Guide for details. If you’re not familiar with the complexities of JIRA admin, then don’t mess with stuff.
Some JIRA Admin Basics
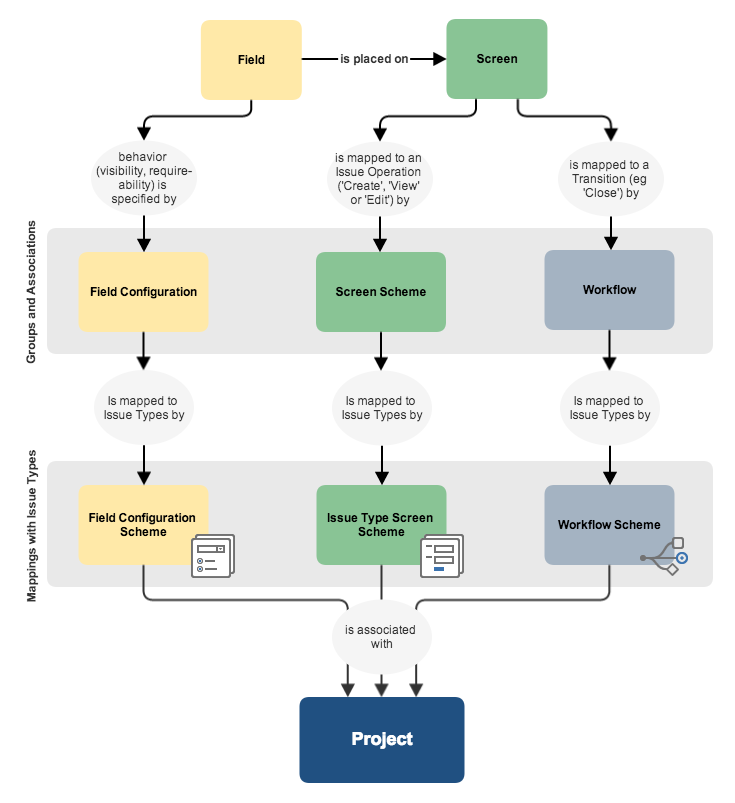
You can set all this up by just following the simplified step by step that I’ve documented here. You don’t need to be a JIRA guru. But if you’d like to understand more about all of this, you can study the JIRA Administration Guide. In there is a handy diagram that shows how screens are configured, which I’ve included below, that is in the Configuring Fields and Screens section.
 |
| How JIRA organizes configuration elements |
To navigate to the JIRA Administration Console, click on the gear icon in the upper right corner of the page. All of the administration functions are under Administration (gear icon in upper right corner of page) and listed on the pulldown menu that appears. And also most of them are accessible from links on the administration pages too.
TIPS: JIRA Best Practice
To make these new configuration elements that you add, easier to find and keep track of, you should name them with a consistent prefix. In the steps below we will use Scrum Simplified as our prefix on everything we add in JIRA Administration.
In the current version of JIRA Agile v6.3.7, depending on the path you use to create your project, you will get different defaults set. You can change these later, but it’s best to create your project with the steps below, so you don’t need to mess with it. I’m not sure if it’s a bug or by design, but it isn’t intuitive, so beware and follow these steps.
 |
| Agile Getting Started page |
1. From the Agile pulldown menu, select Getting Started.
2. Under Scrum, click Create a new board.
3. Follow the prompts and let it do the work of setting up the basics for you.
Create Issue Type Scheme
1. Go to Administration (gear icon in upper right corner of page) > Issues (pulldown menu or tab) > ISSUE TYPES (section in left navigator) > Issue Type Schemes.
2. Click Add Issue Type Scheme.
3. Fill in Scheme Name: Scrum Simplified Issue Type Scheme
4. Fill in Description: Designed based on industry standard Scrum process. Includes Epic, Story & Sub-task.
5. Select in Default Issue Type: Story
6. In the section titled Issue Types for Current Scheme drag and drop the following issue types over from the section titled Available Issue Types: Epic, Story, Sub-task
7. Click Save.
 |
| How your Issue Type Scheme should look |
Create Screens
There are 3 screens that you will create, that will be used by the 3 issue types setup above in the Issue Type Scheme.
1. Go to Administration > Issues > SCREENS (section in left navigator) > Screens.
2. Click + Add Screen.
3. Fill in Name: Scrum Simplified Epic Screen
4. Fill in Description: Designed based on industry standard Scrum process.
5. Add this list of Fields, in this order:
Epic Name, Summary, Description, Attachment, Labels, Linked Issues, Business Value, Reporter, Assignee
TIPS: For fast field selection
In the Select Field… box, you can type the first 1 or 2 letters of the field name and it will shorten the list using those letters. You can use the cursor keys to highlight the one you want and hit the Enter key to select it. So selecting all the fields can be done really fast, using only the keyboard.
6. Click back to Screens.
7. Copy the screen you just created to save you some steps. The copy will have all of the same fields and the description. Create these additional screen names: Scrum Simplified Story Screen & Scrum Simplified Sub-task Screen.
8. Set these 2 additional screens with the fields below.
 |
| How your Scrum Simplified Epic Screen should look |
Scrum Simplified Story Screen
Summary, Description, Attachment, Labels, Epic Link, Linked Issues, Story Points, Reporter, Assignee, Due Date
Scrum Simplified Sub-task Screen
Summary, Description, Attachment, Labels, Linked Issues, Reporter, Assignee, Due Date, Time Tracking
TIPS: Use this field order
The order in which you place the fields on these screen pages, will be the order the fields are listed for the user in the create and most edit user experiences. So I’ve listed these fields here in a logical order that balances the needs of the Scrum process and UX consistency, so that generally speaking the more significant fields are listed first.
Create Screen Schemes
1. Go to Administration > Issues > SCREENS > Screen Schemes.
2. Click + Add Screen Scheme.
3. Fill in Name: Scrum Simplified Epic Screen Scheme
4. Fill in Description: Designed based on industry standard Scrum process.
5. Select Default Screen as: Scrum Simplified Epic Screen
6. Click Add.
 |
| How your Scrum Simplified Epic Screen Scheme should look |
7. Repeat these steps, adding the following screen names with these default screens. Use the same description as above.
Name: Scrum Simplified Story Screen Scheme
Default Screen as: Scrum Simplified Story Screen
Name: Scrum Simplified Sub-task Screen Scheme
Default Screen as: Scrum Simplified Sub-task Screen
Create Issue Type Screen Scheme
1. Go to Administration > Issues > SCREENS > Issue Type Screen Schemes.
2. Click + Add Issue Type Screen Scheme.
3. Fill in Name: Scrum Simplified Issue Type Screen Scheme
4. Fill in Description: Designed based on industry standard Scrum process. Includes Epic, Story & Sub-task.
5. Select Screen Scheme as: Scrum Simplified Story Screen Scheme
6. Click Add.
7. Click + Associate an Issue Type with a Screen Scheme.
8. In the Associate an Issue Type with a Screen Scheme pop up box, select Issue Type Epic and select Screen Scheme as: Scrum Simplified Epic Screen Scheme
9. Repeat steps 7 and 8 to add the following
Issue Type: Story
Screen Scheme as: Scrum Simplified Story Screen Scheme
Issue Type: Sub-task
Screen Scheme as: Scrum Simplified Sub-task Screen Scheme
 |
| How your Scrum Simplified Issue Type Screen Scheme should look |
You might ask: Why add an association for Scrum Simplified Story Screen Scheme when we already selected it as a default ? I just prefer to explicitly specify the associations so it is all clearly documented and if we ever want to change the default, everything is already explicitly set so there is less fooling around with it and less chance of something accidentally getting messed up.
Configure your Project
1. Go to Administration > Projects.
2. Click the project with which you want to use this new Scrum Simplified schemes.
3. You are going to change 2 schemes. The Issue Types and Screens, which you will set them to the following:
Issue Types = Scrum Simplified Issue Type Scheme
Screens = Scrum Simplified Issue Type Screen Scheme
Both are set with the same kind of steps, as follows:
3a. Under the section you want to change, Issue Types and Screens, under the text Scheme: click on the name of the current scheme (this will be a clickable link).
3b. On the page that then displays, click the Actions pulldown menu in the upper right corner. Then click Use a different scheme.
3c. In the pulldown list that displays the schemes available, select the appropriate one.
 |
| How your Project configuration should look – Note the items in RED box are the ones you change |
Like this:
Like Loading...
Related